


Unless you purchased the domain from Intech Cloud Hosting, knowing how to point a domain to us is important if you’re using our server. The following tutorial will show you how to connect the name to the service.
IMPORTANT: Before beginning this tutorial, you should be aware that DNS changes can take up to 24 hours to fully propagate worldwide.
How to Point a Domain Name to Intech Cloud Hosting?
Intech Cloud Hosting Default Nameservers are:
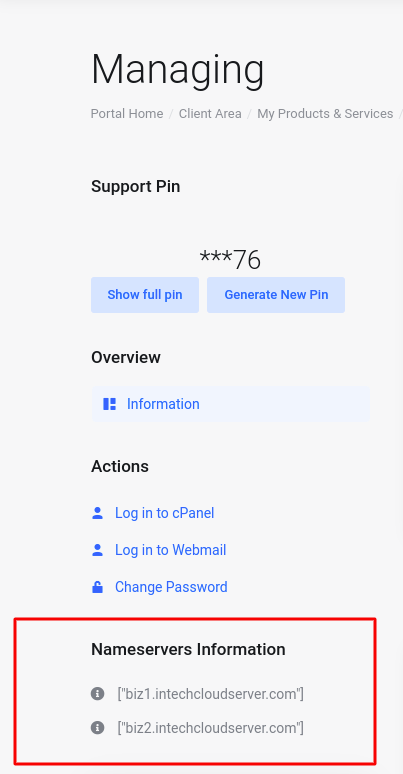
ns1.intechcloudserver.com
ns2.intechcloudserver.com
You might have a different nameserver based on your hosting package. Your hosting widgets will display this nameserver.
There are two main ways to point a domain name to Intech Cloud Hosting:
- Changing the nameservers at your domain name registrar. This method is recommended since your DNS zone will be automatically configured to match the hosting’s IP Address. Plus, it enables you to transfer the control of your domain settings to our cPanel, making management convenient.
- Pointing the domain name via A record. This method requires you to change the IP address connected to the DNS records. That way, your domain control stays in the registrar. Unless you’re sure the IP address is going to be static, this procedure is not recommended.
This guide shows how to point a domain name if it’s NOT registered with Intech Cloud Hosting. For a general tutorial on pointing a domain name to another provider, check out this Guide.
Changing Domain Nameservers (Recommended)
The process of changing nameservers on various registrars is quite similar. Here’s what you need to do to point your domain name to Hostinger:
- Find the nameservers for your Hosting account. You can do this by accessing the services menu on your client area and then click on your hosting account to view detail of your hosting. We use two nameservers to ensure stability and maximum connectivity. So if one nameserver failed, the other will resolve the requests.
- Log in to your domain registrar’s control panel. If you’ve forgotten the name of the registrar’s company, use WHOIS lookup.
- o to the DNS Zone Editor. Depending on the registrar, it can be named differently. The most common ones are DNS editor, Manage DNS Settings, Change Nameservers, DNS Details, etc.
- Delete all values from the nameserver fields (if any) and input Hostinger’s nameservers. Save your changes. It might take up to 24 hours for DNS to fully propagate worldwide.
Pointing a Domain Name via A Record
As mentioned earlier, it’s an alternative you can try if you wish to keep control of your DNS zone at your domain’s registrar. It consists of two primary steps:
Step 1: Changing A Records
A Record maps a domain name to its appropriate IP address. Therefore, if you want to point your domain name to Intech Cloud Hosting, you can modify these records by replacing the old IP address with the one from Intech Cloud Hosting.
In most cases, you have to create two A records for your domain name: one with the www subdomain and one without.
For instance, if you have a domain named yourdomain.com and want to point it to 212.1.212.62 as its IP address, you need to create A Record entries that look like this:

It’s also possible that your www subdomain is pointed via the CNAME (alias) record. In that case, you only have to change the A record for your root domain name.
Don’t worry if you see a slightly different view at your registrar. Just fill in the values that look similar to the ones shown above. Each field stands for:
- Name/Host – the domain or the subdomain you want to point to. Some registrars use @ symbol instead of a name to represent the root domain.
- TTL – short for Time to Live. It determines how long the server caches DNS-related information before refreshing it. The default value is usually 14400 seconds (4 hours).
- Type – record type.
- Record/Address – the target IP address.
Step 2: Changing MX Record for Email
MX record specifies mail servers that handle incoming emails. If you want to use Intech Cloud Hosting servers to receive emails sent to your domain, you need to change your domain’s MX record.
At Intech Cloud Hosting, the MX record can be found in DNS Zone Editor as well.

Take note of the mail server’s address. After that, open your domain’s MX record and replace the old mail server:
- Name – your domain name.
- Priority – if you have more than one server, this field determines the priority of each server. The lowest number represents the highest priority.
- Type – record type.
- Address/Points to – destination/address of the server responsible for receiving emails.
Conclusion
By finishing this tutorial, we have learned the two ways to point a domain name to Intech Cloud Hosting. The first is by changing the nameservers, and the second is by changing your registrar’s A Record.
We recommend the first option as it automatically sets your domain with our IP Address so you don’t have to go through another hassle if it changes one day.
So what do you think? Which method will you choose? Let us know in the comments below!
Read Also: