Do you want to earn passive income from your website? Using AdSense is one of the best ways to make money online! This article will show you how to add AdSense to your WordPress site and help you get started.
What is Google AdSense?
AdSense is a program from Google that allows webmasters to showcase ads on their sites. By setting it up, you can place contextual ads in various locations of your website, such as the sidebar, footer, or in-between posts.
Google will go through its ads database to find the most related ads based on your site’s content. For example, if you start a blog about shoes, it will put ads related to socks and footwear on your website.
Then, how can you get the income? Well, it runs on a CPC (cost per click) system – every time someone clicks on the ads, you will get a certain amount of money. The value is determined by factors such as keyword bids and quality scores.
Benefits of AdSense
Before we continue with the tutorial, let’s have a quick look at what you can expect from Google AdSense:
- Easy to use – to display the ads, you just need to get the AdSense code and paste it onto your WordPress site.
- Flexible ad formats – adjust the ads based on the available space and layout of your website. Furthermore, the ads will be taken care of by Google.
- Add multiple sites – you can set it on more than one website. The only requirement is that your sites should be in line with AdSense terms and policies.
- Seamless support – the help center and AdSense community are ready to solve your problems. Moreover, you can find plenty of tutorials to help you learn more about AdSense.
- Prompt payment – it has a monthly payment cycle, making sure that you’ll get your money on time.
Now that you know the benefits of using AdSense, we’ll show you how to set it up in the next section!
How to Set up Adsense on Your WordPress Site?
In the following steps, you will learn how to configure ads for your site. Let’s take an in-depth look!
Step 1. Create AdSense Account and Connect to a Website
First of all, you need to sign up for a Google Adsense account. Click Get Started and fill all the required fields. Next, you’ll have to connect AdSense with your WordPress site through these steps:
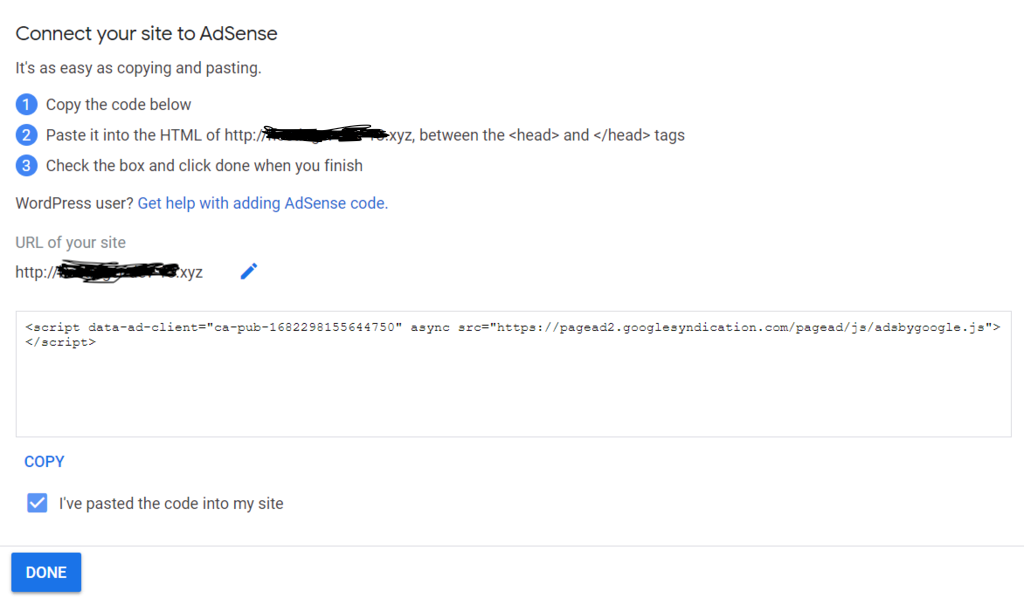
- On the Connect your site to AdSense page, there’s a set of code that you should embed to your site’s header. Remember, only copy the code and don’t click Done. Avoid closing the page, as well.
- Enter your WordPress admin dashboard.
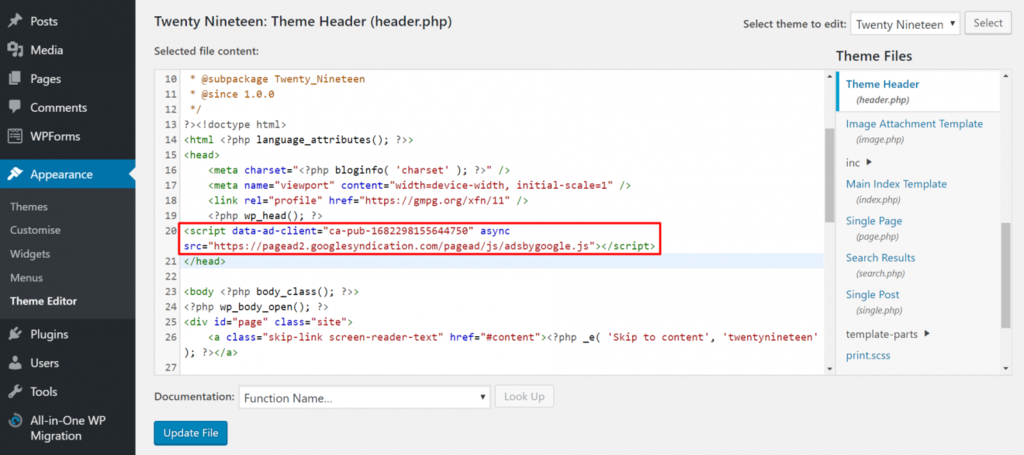
- Click Appearance -> Theme Editor, then choose Theme Header in the Theme Files section.
- Insert the code just above the </head> tag.
- Select Update File.
- Go back to the AdSense page, tick the I’ve pasted the code into my site checkbox, and press Done.
- A dialog box will pop up to tell you that your account approval is in progress. Click Got it.
Step 2. Insert Ad Unit
Wait for the account activation process. You’ll receive an email after your site has been reviewed. Once your account is approved, you can start creating ad units:
- Access the Adsense dashboard and click on My Ads in the left sidebar.
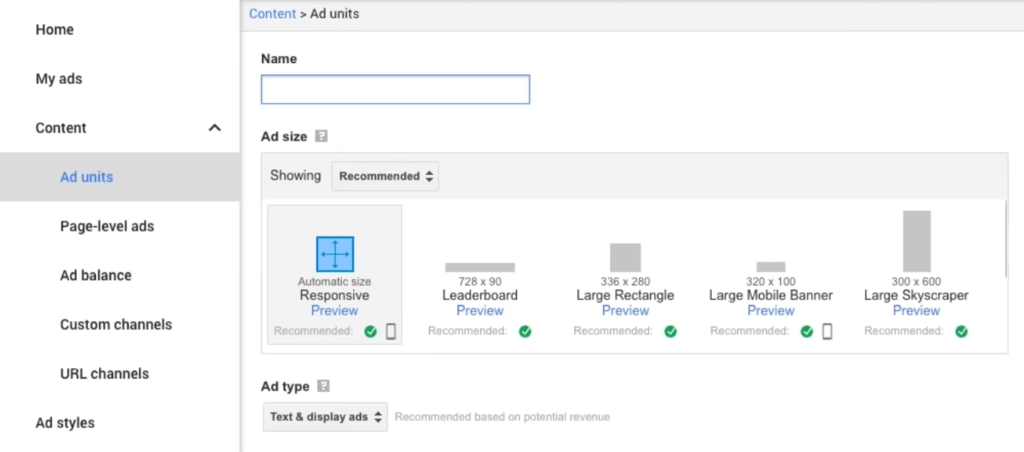
- Navigate to Content -> Ad units and click the New ad unit button.
- Pick the Ad type. As an example, let’s choose Text & Display ads.
- Customize the necessary settings and make it suitable for your website design:
- Name – enter a unique name to represent the ads. It will be easier to manage multiple ads in the future.
- Ad size – the shape and size of the ads will affect the view of your website. It’s recommended to select Responsive so the ads can adapt to all screen sizes.
- Ad type – you can use this option to switch to another ad type, such as in-feed or in-article ads.
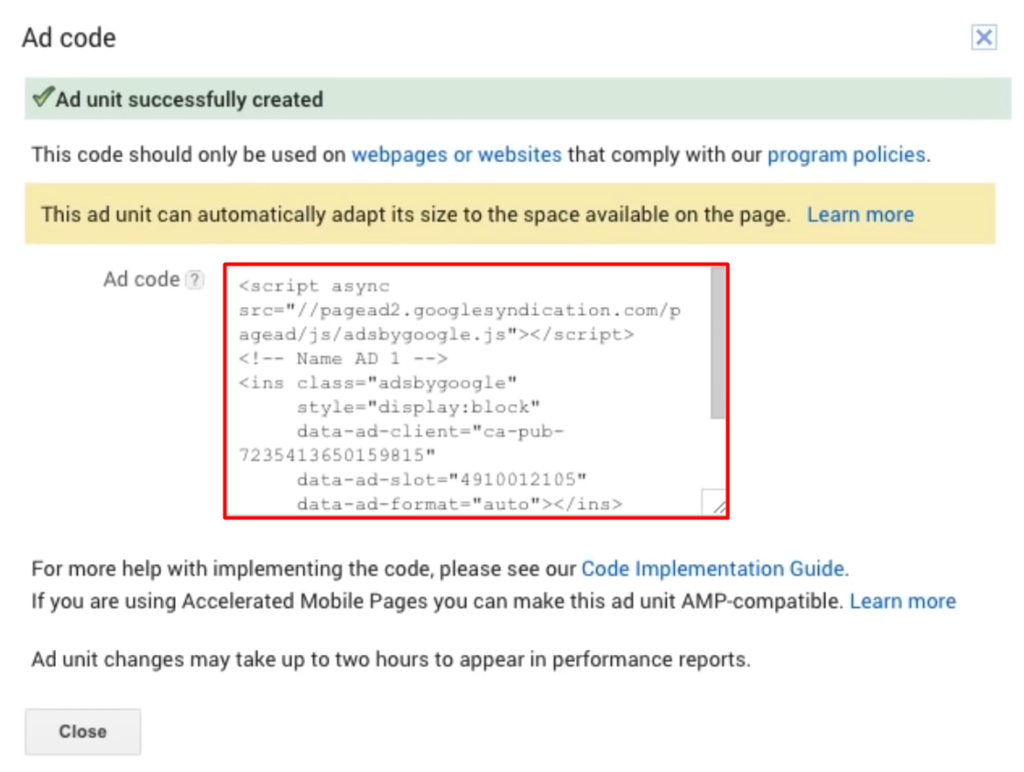
- Press Save and get code. A new window with your AdSense code will appear:
- Select and copy the code – you will need it for the next step.
Step 3. Embed Ad Code to WordPress
After getting the ad code, you should embed it to your site. There are two ways to do it – manually or using plugin:
Inserting Ads Manually
Here’s how you can add the ad code manually by using a widget:
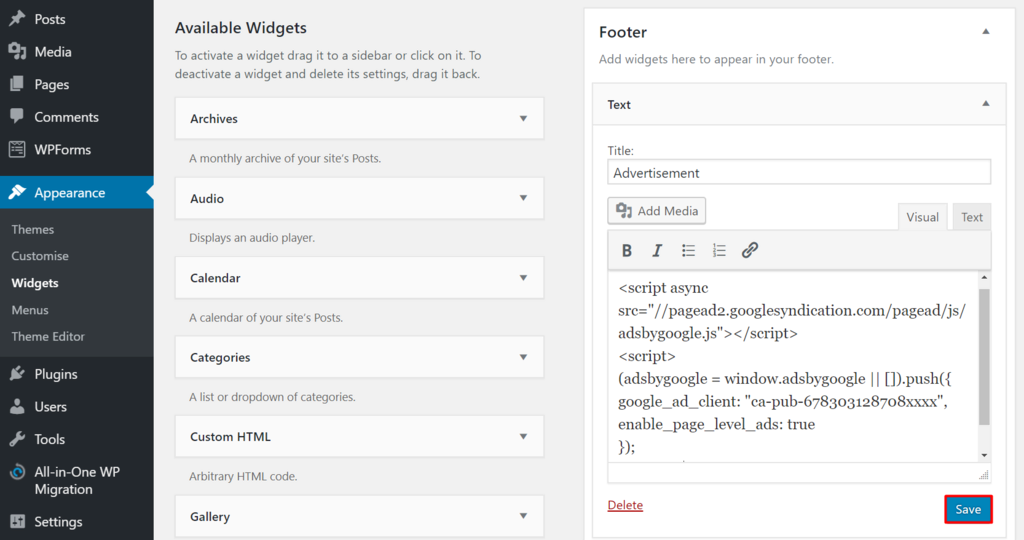
- Log in to your WordPress dashboard and navigate to Appearance -> Widgets.
- To add a new widget, select Text to choose where you want to display the ads. In this example, we will place it at the footer. Then, press the Add Widget button.
- Fill in the Title (or leave it empty) and paste the Google AdSense code in the Content field.
- Once done, Save your changes.
Using Plugin
One of the easiest ways to insert AdSense code to WordPress is by installing a plugin. Here are some of the most popular ones from the WordPress plugin directory:
- Ad Inserter – is an excellent ad placement plugin. It offers options to insert ads on your site – including before and after post, or between posts on blog pages. If you want to get additional features like sticky sidebar ads and sticky ad animation, you can purchase the Pro license, which starts from $22.31/year.
- Advanced Ads – offers great ad management features, such as displaying unlimited ads, saving ads draft, and scheduling ads. If you purchase the Pro plan that starts from $43.51/year, you will get features like click fraud protection and alternative ads for ad-block users.
- Woody ad snippets – allows you to create snippets and put ads into them. You can also insert ads to posts, pages, or categories. It’s free, but you can purchase the pro plan for $19/year to get access to the snippets library that contains a vast collection of pre-built snippets.
AdSense Best Practices
Aside from what you’ve learned so far, here are a few best practices that can help you when using Google AdSense on your WordPress site:
Do’s
- Your website should follow the webmaster quality guidelines and AdSense program policies to get your site approved quickly.
- Use AdSense heatmaps, which will help you with ad placement.
- Look at the sizes of the top-performing ads. Choose the one that suits best with your website layout.
- Write engaging content that would attract users to your website. This will increase the chances of getting clicks on your ads.
- Conduct Google experiments to see which ad works.
- Make sure that both your website and the ads are responsive.
Don’ts
- Clutter your site with too many ads as this will bounce off the visitors.
- Click your own ads. Fraudulent clicks will get your account banned.
- Force users to click on your ads by using call-to-action texts like “Click on ads.”
- Place ads that do not yield better earnings. Track the ads’ performance regularly.
- Insert ads on empty pages.
- Bring automated traffic to your website to avoid account closure.
- Make multiple AdSense accounts with the same payee name.
Conclusion
This tutorial has shown you how to add Adsense to WordPress and monetize your website. Give your ads more exposure by driving more traffic through high-quality content. However, make sure to follow the AdSense program policies to avoid account closure.
Do you have any questions regarding Google AdSense? Let us know in the comment section below!


