In this tutorial, you will learn how to restore backups using JetBackup 5 interface in cPanel.
What is JetBackup?
JetBackup is a tool available in your cPanel that provides powerful backup and recovery solutions.
Our systems have been fully automated to create remote (off-site) backups for you, making this process super easy! We take daily off-site backups (around midnight) of your data and store them for up to a certain number of days based on your hosting plan.
JetApps recently released JetBackup 5 to the EDGE tier. This release summarizes core bug fixes, plugin updates, additional features, and some GUI updates!
Enjoy your peace of mind with IntechCloud's nine different backup options for your sites through JetBackup.
What are the restore options available in JetBackup 5?
JetBackup 5 provides users with nine different options for creating backups in their cPanel and can be found in the Files section of your cPanel.
cPanel Configuration, Home Directory, Cron Jobs, Databases, Database Users, DNS Zones, SSL Certificates, Email Accounts, FTP Accounts.
In this tutorial, we’ll review the details and how to use the most popular and frequently used JetBackup Options:
- Full Account Backups.
- File Backups.
- Database Backups.
- Email Backups.
Before we begin, let’s break down some information you will see along with the backup and restore process.
What’s an Incremental Backup?
Incremental backups are a type of backup wherein only information that has changed is backed up, versus creating a full backup each time.
Let’s speculate and say your website is configured as follows:
- Your website is a WordPress site with lots of photo galleries.
- The total amount of data in your account, including all images, WordPress installations, databases, and email in your mailbox, is 5 GB.
- You set a schedule to back up your website every night at midnight.
- Your web hosting provider gives you 20 GB of disk space.
If you have, for example, a WordPress site with many photo galleries that total 5 Gigabytes (GB) and used a full backup instead of incremental backup, your backups will have consumed 20 GB of space after five days. You wouldn’t be able to upload new content to your website.
By using an incremental backup, your backup sizes only grow when you add content instead of being (essentially) cloned or duplicated in full as part of your backup schedule.
What does Location – Remote mean?
IntechCloud has configured your automated backups to be stored on a separate group of servers in a different location than the server hosting your websites and storing your e-mails. This is done for recovery purposes. Having these remote/off-site backups keeps your information safe and sound, so you can rest easy!
How to Download or Restore Full Account Backups using JetBackup 5
Restoring a Full Account Backup
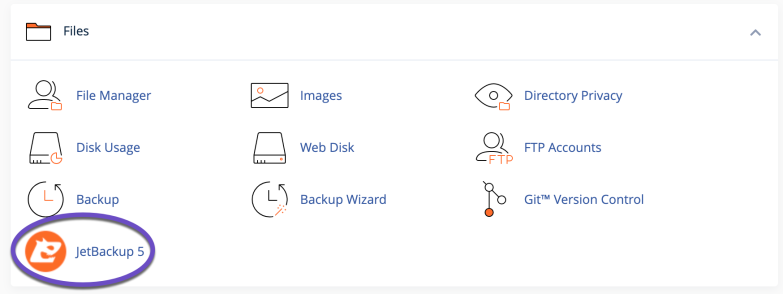
Step 1: Log in to your cPanel. There are many ways to do this, but the sure-fire easiest way is to log in to your Client Area, then open your cPanel.
Step 2: Once you’ve logged in, scroll down through your cPanel and find the Files section, then open JetBackup 5.
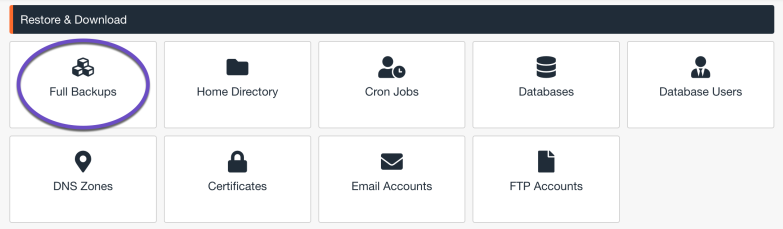
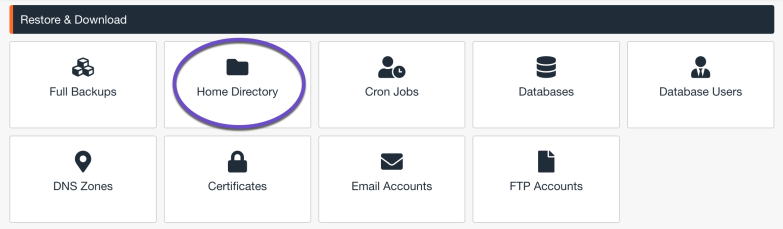
Step 3: Once Jetbackup 5 interface opens, search for the Restore & Download option and click Full Backups
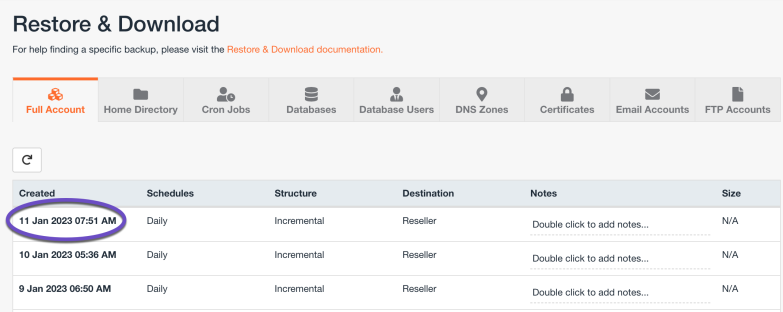
Step 4: The Full account backup restore option will open. Choose the backup date you want to restore by clicking on it, then scroll down the page and click on the Restore button.
Step 5: You will be presented with a list of Items To Restore. To restore everything that is part of a cPanel Account, leave all these selected, then click Restore Selected Items.
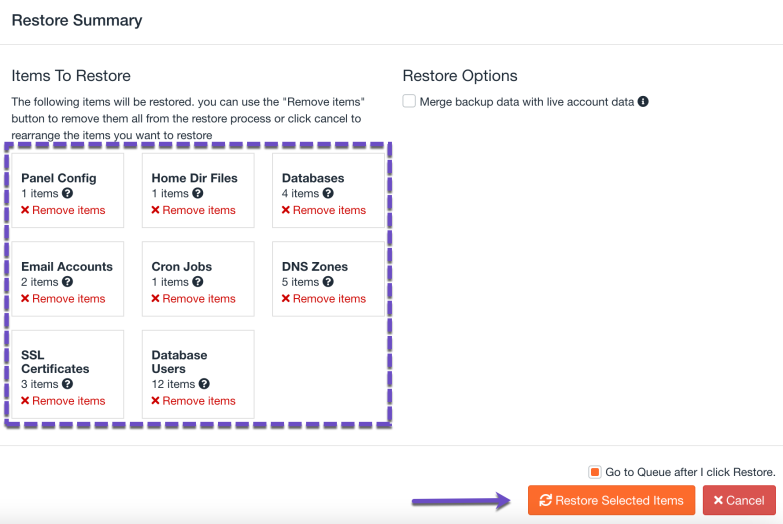
The Merge backup data with live account data option comes in handy if you’d like to preserve existing data on the account and merge it with the existing data from the date you’re restoring it.
Step 6: The selected account will be queued for restoration. You will see a success notification in the top right corner.
However, unlike a Download, a Restore takes place behind the scenes. To check the status of the Restore, you’ll need to open the Queue. Click the Queue icon, the last icon from the row of tools on the left.
How to Download a Full Account Backup
Step 1: Log in to your cPanel. There are many ways to do this, but the sure-fire easiest way is to log in to your Client Area, then open your cPanel.
Step 2: Once you’ve logged in, scroll down through your cPanel and find the Files section, then open JetBackup 5.
Step 3: Once Jetbackup 5 interface opens, search for the Restore & Download option and click Full Backups
Step 4: The Full account backup restore option will open. Choose the backup date you want to restore by clicking on it, then scroll down the page and click on the Download button.
Step 5: You will be presented with a list of Items To Download. To download everything part of a cPanel Account, leave all these selected, then click Download Selected Items.
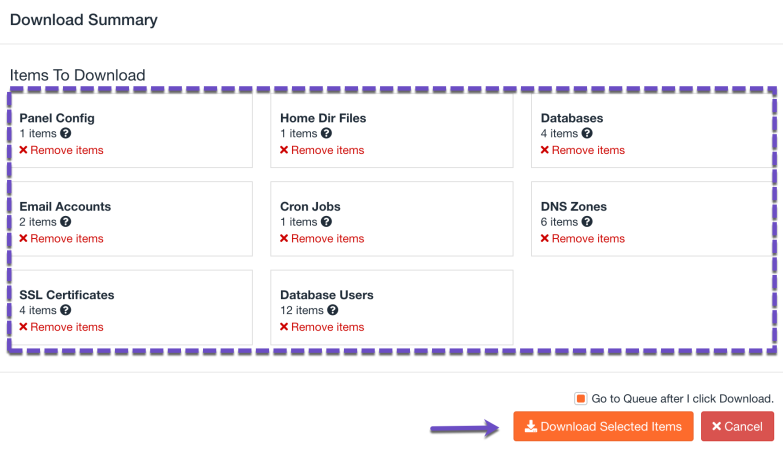
Step 6: The selected account will be queued for download. You will see a success notification in the top right corner.
Step 7: Click the Downloads button on the left menu to access your downloads.
After clicking Downloads, a page will open with your downloads available.
Just look for the download you want to save to your computer and click the Download button. The file will be saved to your computer.
How to Restore Files using JetBackup 5
Step 1: Log in to your cPanel. There are many ways to do this, but the sure-fire easiest way is to log in to your Client Area, then open your cPanel.
Step 2: Once you’ve logged in, scroll down through your cPanel and find the Files section, then open JetBackup 5.
Step 3: Once Jetbackup 5 opens, click Home Directory to open the file restoration tool.
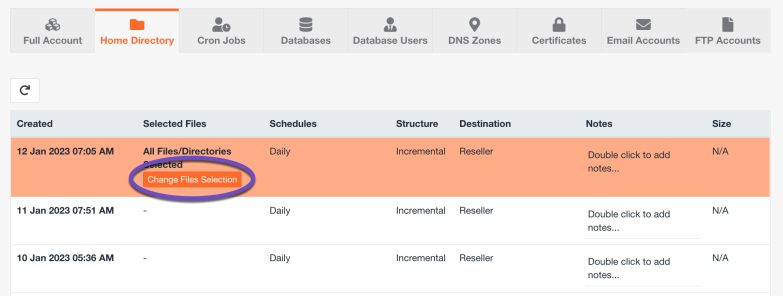
Step 4: After clicking Home Directory, you will be given a list of backups. In my example, I’m going to restore from the latest backup, so I will choose the backup at the top by clicking on it.
Step 5: You’ll note the selection turns orange and a button has appeared. To select the files or folders I want to restore, you need to click the Change File Selection button.
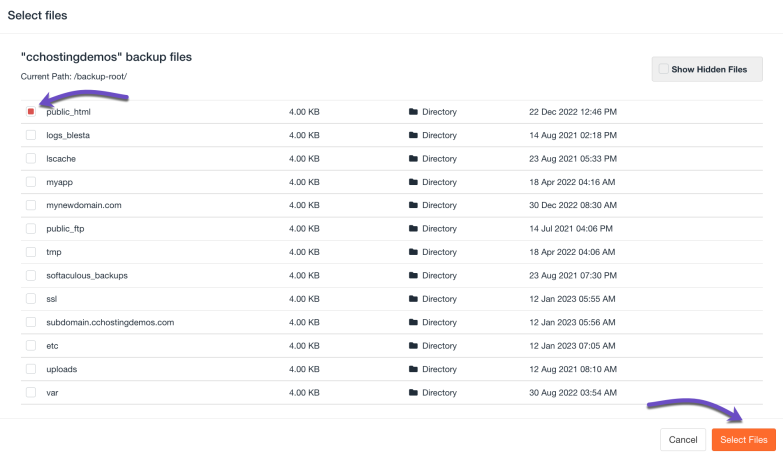
Step 6: After clicking that button, a modal will appear, or you will be presented with a list of folders and files in your home directory.
Step 7: Click through these folders until you locate the file or folders you want to restore. Once you’ve located the folder, you’ll tick the checkbox to the left of the folder in the bottom right of the modal and click Select Files.
In my example, I will restore all the files inside the public_html directory, which belongs to my primary domain. If you’re restoring the files belonging to an addon domain.
Step 7: After clicking that button, the modal will disappear. Now scroll down the page and look for the two options to Restore or Download these files. Depending on what you want to do, you can choose an option here.
I want to restore, so I’m going to click Restore. However, if you want to download these files, you can click download, and they will be made available to you as a zip file.
Step 8: After clicking Restore, a modal will appear, asking you to confirm the restoration. Just click the Restore selected items button.
Step 9: To access the queue, look for the Queue option on the Jet Backup homepage.
The restore you requested should be listed, and you will be able to see the progress of the restore in real-time beneath the Status column. You also have the option to cancel the queued recovery if you wish. In my case, I’m going to leave this as is, and as you can see it is already completed. Once completed, you will see the status column has been changed to complete.
This means that recovery was successful, and everything has been put back the way it was on the date you chose for the recovery.
And that’s how you use the File Recovery feature in JetBackup 5!
How to Download or Restore Database Backups using JetBackup 5
JetBackup 5 keeps copies of your Databases safe and sound just in case you need to recover one. This feature could be handy if you installed a WordPress plugin that corrupted your site; for example, the only option is to restore the Database to a time before that plugin was installed.
How to Restore a Database Backup
Step 1: Log in to your cPanel. There are many ways to do this, but the sure-fire easiest way is to log in to your Client Area, then open your cPanel.
Step 2: Once you’ve logged in, scroll down through your cPanel and find the Files section, then open JetBackup 5.
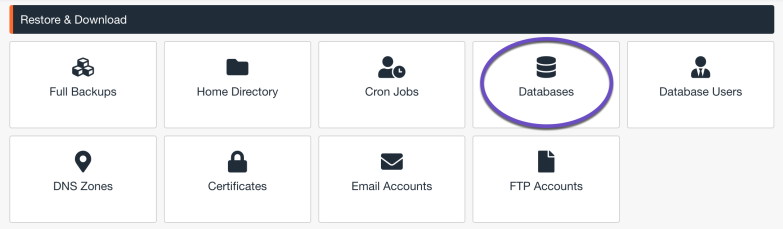
Step 3: Once Jetbackup 5 opens, click Databases to open the file restoration tool.
Step 4: After clicking Databases, you will be given a list of available database backups. In my example, I’m going to restore a database called “cchostingdemos_8” from the latest backup, so I will choose the backup at the top by clicking on it. If you’re using WordPress.
If you need to choose another date for the Backup, click “Choose Other Backup.”
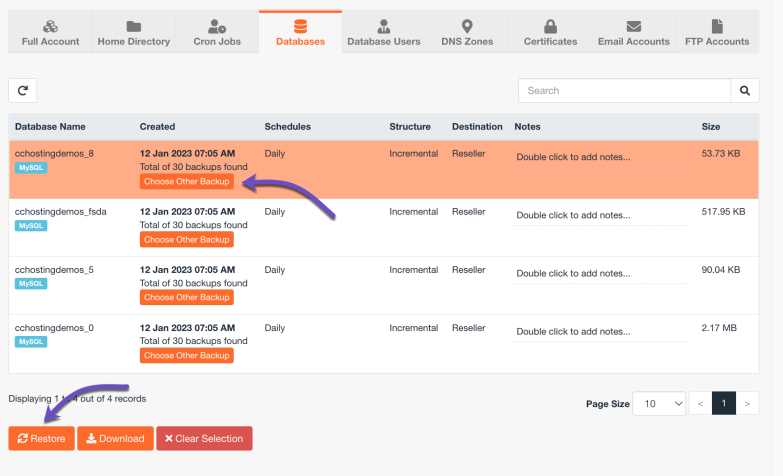
When you’re ready to restore the Database, click the Restore button.
On the next screen, you’ll be presented with a list of items to restore. Click the “Restore Selected Items” button to restore the Database.
Step 7: The Database will be queued for restoration.
However, unlike a Download, a Restore takes place behind the scenes. To check the status of the Restore, you’ll need to open the Queue. Click the Queue icon, the last icon from the row of tools on the left.
And that is how you restore a database from a backup!
How to Download a Database from Backup
Step 1: Log in to your cPanel. There are many ways to do this, but the sure-fire easiest way is to log in to your Client Area, then open your cPanel.
Step 2: Once you’ve logged in, scroll down through your cPanel and find the Files section, then open JetBackup 5.
Step 3: Once Jetbackup 5 opens, click Databases to open the file restoration tool.
Step 4: After clicking Databases, you will be given a list of available database backups. In my example, I’m going to download a database called “cchostingdemos_8” from the latest backup, so I will choose the backup at the top by clicking on it. If you’re using WordPress.
If you need to choose another date for the Backup, click “Choose Other Backup.”
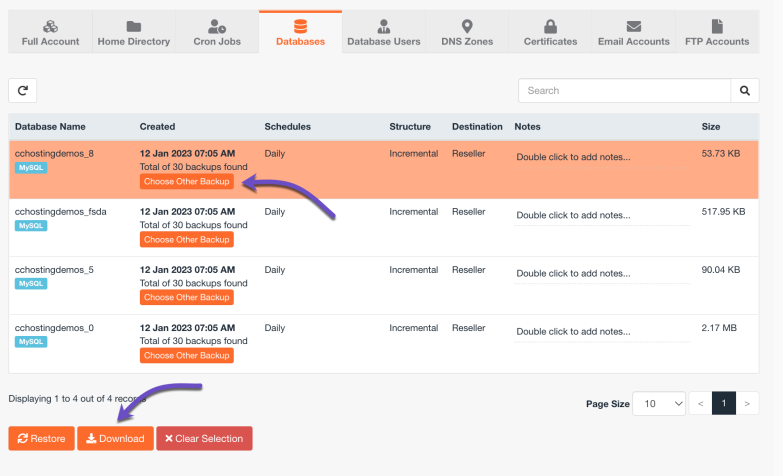
When you’re ready to restore the Database, click the Download button.
You will be presented with a list of Items to Download, then click Download Selected Items.
Step 5: After you click Download Selected Items, you’ll be returned to the Queue screen.
Step 6: Click the Downloads button on the left menu to access your downloads.
After clicking Downloads, a page will open with your downloads available.
Just look for the download you want to save to your computer and click the Download button. The file will be saved to your computer.
How to Download or Restore Email Backups
We’ve all been there. Whether you deleted the email containing the address to the place where you’re having a job interview, an email with a bunch of photos from your Grandkids, or those client files, worry no more because, with JetBackup 5, you can recover those messages!
How to Restore an Email Account from Backup
Step 1: Log in to your cPanel. There are many ways to do this, but the sure-fire easiest way is to log in to your Client Area, then open your cPanel.
Step 2: Once you’ve logged in, scroll down through your cPanel and find the Files section, then open JetBackup 5.
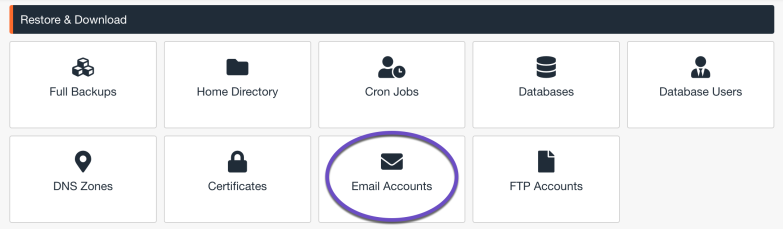
Step 3: Once Jetbackup 5 opens, click Email accounts to open the file restoration tool.
Step 4: After clicking Email accounts, you will be given a list of available email accounts backups. In my example, I’m going to restore an email account called “[email protected]” from the latest backup, so I will choose the backup at the top by clicking on it.
If you need to choose another date for the Backup, click “Choose Other Backup.”
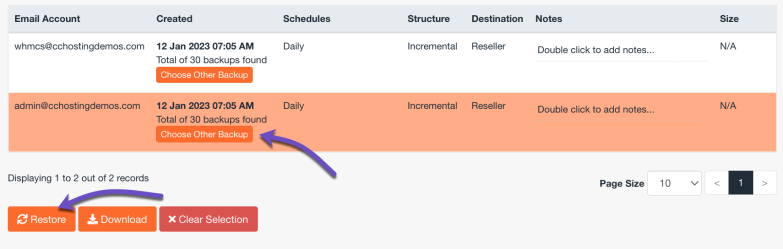
When ready to restore the email address, click the Restore button.
On the next screen, you’ll be presented with a list of items to restore. Click the “Restore Selected Items” button to restore the email account.
Step 5: The Restore will be queued for restoration.
However, unlike a Download, a Restore takes place behind the scenes. To check the status of the Restore, you’ll need to open the Queue. Click the Queue icon, the last icon from the row of tools on the left.
Step 6: Once the Queue is open, you will see a list of tasks. As you can see from the list below, the Restore I requested in the previous step has already been completed.
And that is how you restore an email account from a backup!
How to Download an Email Account from Backup
Step 1: Log in to your cPanel. There are many ways to do this, but the sure-fire easiest way is to log in to your Client Area, then open your cPanel.
Step 2: Once you’ve logged in, scroll down through your cPanel and find the Files section, then open JetBackup 5.
Step 3: Once Jetbackup 5 opens, click Email accounts to open the file restoration tool.
Step 4: After clicking Email accounts, you will be given a list of available email account backups. In my example, I’m going to download a backup of an email account called “[email protected]” from the latest backup, so I will choose the backup at the top by clicking on it.
If you need to choose another date for the Backup, click “Choose Other Backup.”
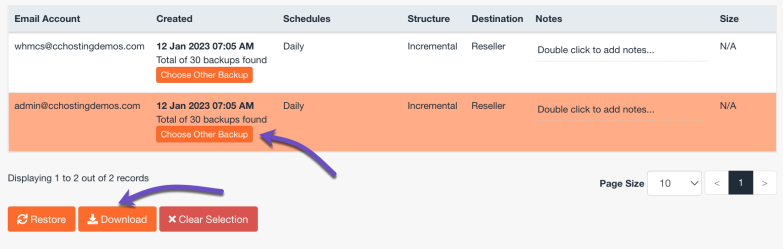
When ready to restore the email address, click the Download button.
On the next screen, you’ll be presented with a list of items to generate a download. Click the “Download Selected Items” button to restore the email account.
Step 5: Click the Downloads button on the left menu to access your downloads.
After clicking Downloads, a page will open with your downloads available.
Just look for the download you want to save to your computer and click the Download button. The file will be saved to your computer.
And that is how you download an email account from backup!
Conclusion
JetBackup 5 provides practical tools for backing up (for offline storage) and restoring full accounts, individual files and folders, databases, email accounts, and more.
If you have any questions about using one of the options in your JetBackup section of cPanel, especially if you are considering using the restore feature, reach out to our live chat support to have your questions answered!
